Thursday 28 June 2012

Bread and Butter Pickles

I have been busy compiling a street party recipe book for our annual street party on 7 July.  Hence, very little sewing.  However, whenever small, knobbly cucumbers are available in the market, (not the English salad type), I take the time to make my mother's bread and butter pickles.  We all love them in our family and so do our friends.

This year I used 4 pounds of cucumbers (about 7 inches long) and 4 medium sized onions.  The quantities do not need to be exact, and in fact, my mother's old recipe refers to bushels and pecks.  I have no idea how to translate this into English measurements, so I usually use 4 - 6 pounds of cucumbers and 4 - 6 onions.  I make the same amount of brine, though, because once again, I have no idea how to reduce the amount proportionately.  This may sound haphazard, but it is a recipe handed down from my grandmother, who, I'm sure was not exact in her cooking either.  It always works.

How to Make Bread and Butter Pickles


4 - 6 pounds of small, knobbly cucumbers, thinly sliced.
4 - 6 medium sized onions, thinly sliced.
1/2 cup Kosher salt or sea salt.  (It must be large grained salt, otherwise, you will use too much.)
Put tomatoes and onions in a large container (not metal) and sprinkle with salt.  Leave to stand (lightly covered) for 4 hours or more.  (I leave mine overnight.)
Rinse and drain.
Taste to ensure they are not too salty.

Make the Brine by mixing:
4 cups (32 oz) Cider vinegar (My recipe just says vinegar, but Cider vinegar works best.)
1 cup water.
3 cups white sugar.
1 cup brown sugar.
2 generous Tablespoons of pickling spices. (You can buy these ready mixed at Staiinsburys in England.)  Otherwise, use 1/2 teaspoon allspice, 1/2 teaspoon cinnamon, 1 teaspoon mixed spices, including the tiny bits of chilli.
Bring all this to a boil, then add tomatoes and onions.
Bring back to boil and cook about 5 minutes.
Pour into hot, *sterilised jars filling them as near the top as you dare.
Seal and leave for a few weeks before using  The flavours will be more developed.
These keep for years in the cupboard, but they will probably not last that long.

*Sterilising Jars:
Wash jars and lids in hot, soapy water.  Rinse with boiling water from the kettle.
Put jars and lids in a low oven while making the pickles so they are hot and thoroughly dry.

Here I have served it with quiche and salad, but it is delicious with cold meats and as a toping for hamburgers.


Sunday 24 June 2012

How to Use Bias Binding to Face an Armhole

I am in the process of making not one, but two, Koko Beal dresses and will be blogging both of them soon.   In the meantime, I thought I would do a tutorial on how to face the armholes with bias binding.
In the past I have found armhole facings, cut from the pattern, bulky and cumbersome.  They are usually a bit wide and sometimes ruin the look of the finished garment.  So now I use bias binding to get a better, neater and narrower finish.  It is also easier to stitch bias binding into the armhole as it gives, being bias cut, and allows you a little leeway with the size of the armhole. You do not end up with facing that is a millimetre too large or too small.

After you have stitched, pressed and finished the side seams, measure the bias binding leaving a generous  amount at the ends.


Cut the bias binding for each armhole.


Then, press it open, so you have control of how much seam allowance to sew. Most patterns call for 1.5 cm or 5/8".


Carefully fold under one of the short edges, as shown.

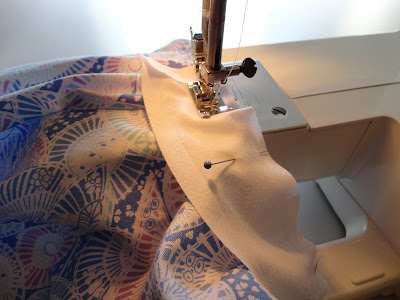
Then pin the binding around the armhole.  I do not tack/baste at this point as I want to have a bit of room to adjust the binding as I sew.


Stitch around the edges, following the curve and checking that you are keeping to the required seam allowance.


 Turn, clip and press.  Then edge-stitch to keep the binding from rolling out when it is turned under.


Fold under raw edge and pin binding into place all around the armhole.


Now, tack/baste into place.


Finish the armhole by 'invisible' hand stitching.  Not shown here.

Wednesday 13 June 2012

Homemade Barbecue Sauce


This barbecue sauce is always a big hit.  It's probably because of the sugar content, but you don't eat barbecue chicken or ribs to lose weight! I don't really like the smoky taste of commercial sauces, so I always make my own and double the recipe.  There never seems to be enough, no matter how much I make.

Preparing the meat:
It is important to cook the meat first.  This method keeps it tender and succulent.
In a covered roasting tin, bake chicken pieces or ribs for 30 - 40 minutes at 350F or 180C.
Remove from pan and place on a foil covered baking tray.
When the sauce is ready, put a Tablespoonful on each piece of meat.
Return to oven, this time uncovered, and bake until sauce is bubbling and caramelised (about 10 minutes).
Serve the rest of the warm sauce with the meat.
You can, of course, finish the cooking on a barbecue, but it is just as delicious cooked in the oven and it does not make such a mess.

Ingredients for the sauce:
2 oz butter
2 Tablespoons vegetable oil
1 large onion, finely chopped
1/2 cup ketchup*
1/4 cup brown sugar
3 Tablespoons Worcestershire sauce
1 1/2 teaspoons chili powder
1 teaspoon salt
18 teaspoon pepper

Preparing the sauce:
Melt the butter and oil together in a small, covered saucepan.
Add the onion and sauté, covered, until soft and golden. (about 5 min)
Add the rest of the ingredients.
Stir, cover and simmer for 5 minutes.

A Little Tip:
*If you decide to double the recipe, you can add a tin of chopped tomatoes, drained, instead of doubling the ketchup. There is no need to double either the butter or the oil.


Sunday 10 June 2012

A Little Bit of Crochet in Granny Stripes

This little bit of crochet is thanks to Lucy at http://attic24.typepad.com.  It was her granny stripe blanket that inspired me.  You can find the pattern, as well as lots of other wonderful crochet, on her blog.

I decided to break with tradition and take my crochet to the knitting group.  For me, crochet is much easier than knitting as I can spot mistakes instantly and rectify them.  
Recently, I got totally fed up making a scarf horizontally ( hundreds of stitches) when I discovered mistakes in the first rows which I couldn't fix. I also decided to do a small project and hence, this will be a small blanket, about cot size. It may not take me a year to finish it! And if it works well, I may try a larger one.

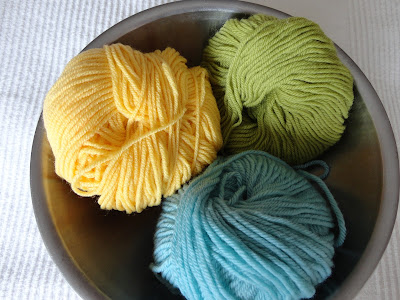
I started with three balls of wool that I already had. Two were Rowan merino wool and the other was a French equivalent.


I took these to France with me when we had a short break and added a few more colours.  


These are not pure wool, unfortunately, but they have some wool content and the crochet hook size is the same.  At first I tried hot pink and a very bright purple as well, but they did not work so they have been stashed away for another project. I think the variety of colours in this still make it unisex.

Here are all the colours:


I think they work well.  I have now completed about 1/4 of the blanket. I did quite a lot in France where it is very pleasant to sit and crochet without guilt about all the other things that need doing.  Since returning, however, I have managed 2 or 3 stripes at each meeting of the knitting group (too much chat), and a few at home in front of the TV when we are not reading subtitles.  (Enjoying BBC4s foreign thrillers on Saturday evenings.) Anyway, there is no rush and I am enjoying the making of it.  I hope to finish it in the summer when we are in France again.

Thursday 7 June 2012

Betsy McCall


When I was a child, I loved dolls and paper dolls.  My mother, who was a very accomplished seamstress, made beautiful clothes for my dolls and I made 'beautiful' things for my paper dolls.  

My mother had a subscription to McCalls magazine and I would wait every month for it to arrive so I could cut out the Betsy McCall paper dolls.  I loved to see what she was wearing and put a lot of pressure on my mother to make me similar outfits.  Often she did.

A few years ago, I remembered Betsy McCall and purchased some 1950's McCalls magazines online. I can't remember whether I purchased this pattern too, because I remember trying to make the doll at some point.  It all went wrong with the hair and I never finished it.  Perhaps I'll try again.

I always assumed Betsy McCall lived in New York and led a much more glamorous life than I did.  She seemed to do more things, go more places and have more fun and I really wanted to be her.

You can see her pretty New Year dresses and she even has a doll with the same clothes.  Oh, the imaginings of a young girl...


Here, she and her cousin and her dog, Nosy are going to the circus. I had a wonderfully indulged childhood and one of my best memories is of going to a fun fair with my family and one of my cousins.


Not sure about this one.  What kind of a joke would Betsy McCall play?  But I love the outfits!


Here, Betsy is looking more modern, and by the time she looked like this, I was no longer playing with paper dolls.  That didn't stop me loving them though.


Finally, she goes to the Flower Show.  That wouldn't have impressed me.  My mother had a lovely garden and I think I took it for granted.  We did go to the State Fair every September, though, and that was very exciting.


I can see I should have used Picasa to crop my photos.  However, if I did that I would never get this blog posted.  Hope you enjoyed my trip down memory lane.  Do you have memories of Betsy McCall


Friday 1 June 2012

Easy Jubilee Cheesecake

This cheesecake is very easy to make, takes very little time and is absolutely delicious.
To measure in cups, use a normal sized coffee mug or a Pyrex jug to the 8oz mark for 1 cup.


What you need:
8" buttered pie or tart dish
10 - 12 digestive biscuits, crushed (1 1/4 cups when crushed)
1/2 cup melted butter (2 oz)
8 oz cream cheese (I use Philadelphia light - about 1 1/4 packages)
1/2 cup sugar (2 oz)
1 Tablespoon lemon juice (Use more if you want a lemony taste and add zest.)
1/2 teaspoon Vanilla Essence
dash of salt
2 eggs

1 cup sour cream (I used creme fraiche)
2 Tablespoons sugar
1/2 teaspoon vanilla

How to make it:
Preheat oven
Put butter in pie pan in oven to melt for 2 - 3 minutes.
Add crushed digestives and pat down to make crust.
Put back in oven for 10 minutes while you make the filling.  This will make the base firmer.
Beat cream cheese with sugar, lemon juice and vanilla until smooth.
Add eggs one at a time, beating them in.

Pour mixture into pie shell and bake approximately 25 minutes at 325 F or 160C.  My fan oven is fast and I baked it for only 20 minutes.  Test the top.  If it is firm, it is done.
Remove from oven.

Beat sugar and vanilla into cream cheese.
Spread over the top of the cheesecake and bake another 10 minutes.

Cool, then chill.

Serve with red and blue fruit - blueberries, strawberries, raspberries, etc.,
or with a coulis made with whizzed up raspberries and strawberries and a dash of balsamic vinegar.

Delicious!